Installation Instructions
APPLICATION
East Coast blankets have the greatest length and width uniformity in the industry – making installation much easier and more consistent. East Coast’s products are delivered with rolled product edges, these edges mean you get a full width of product usage every time! In fact, the thoughtful product design combined with the increased ease of installation can decrease standard labor time by 25% with no reduction in quality.
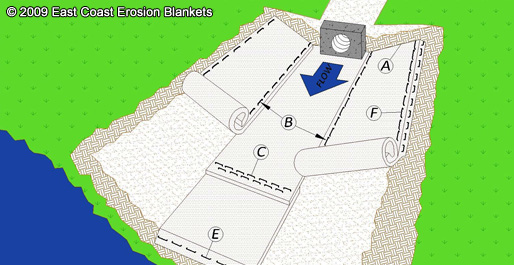
CHANNEL INSTALLATION DETAIL
Installation Instructions:
- Dig a 6″ by 6″ trench both up-slope, down-slope, and along the top side of the channel. Prepare the slope soil surface (raking, seeding and fertilizing). Note, if used with stormwater discharge, place the up-slope trench at the face of the discharge structure footer.
- Begin by placing the center blanket a minimum of 12″ down-slope of the up-slope trench. Secure the blanket at the bottom of the trench with staples placed 12″ apart. Backfill and compact the trench. Apply seed, and fold the blanket over soil, secure with a row of staples placed 12″ apart across the width of the blanket (Diagram A).
- Roll the blanket vertically down the slope. Secure using the appropriate staple pattern below, specified by slope. (Staple Patterns)
- Continue placing blankets up the slopes on both sides, with a minimum 4″ overlapping (Diagram B), and securing each blanket in the beginning trench (Diagram A).
- Additional horizontal blankets can be joined using a minimum 4″ overlapping or shingle style in the direction of water flow. Connect the blankets by placing staples approximately 5″ apart across the width of the blankets. (Diagram C)
- For maximum performance a check slot should be placed at 25′-40′ intervals. Place a row of staples 4″ apart along the entire width of the channel. A second row should be placed 4″ below in a staggered pattern. (Diagram D)
- The end of the blanket must be secured in a 6″ x 6″ trench by a row of staples placed at 12″ intervals. (Diagram E)
- At the top edge of the side slope, fasten the blanket in a 6″ x 6″ trench placed at 12″ intervals. Install an additional row of staples 1′-0″ down slope of the trench along the width of the fabric. (Diagram F)
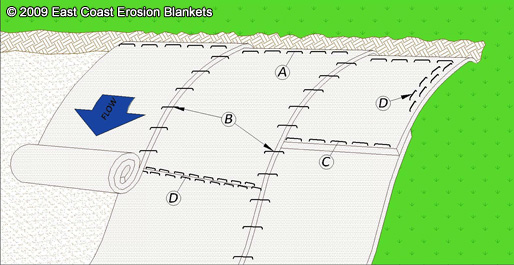
SLOPE INSTALLATION DETAIL
Installation Instructions:
These guidelines are recommendations only. Any questions with the installation should be confirmed with your local distributor.
- Dig a 6″ by 6″ trench both up-slope and down-slope of the area the matting is to be applied. Prepare the slope soil surface (raking, seeding and fertilizing).
- Begin by placing the blanket a minimum of 12″ down-slope of the up-slope trench. Secure the blanket at the bottom of the trench with staples placed 12″ apart. Backfill and compact the trench. Apply seed, and fold the blanket over soil, secure with a row of staples placed 12″ apart across the width of the blanket. (Diagram A)
- Roll the blanket vertically down the slope. Secure using the appropriate staple pattern below, specified by the slope. (Staple Patterns)
- Parallel blankets must be overlapped by a minimum of 4″, and secured with a row of staples placed approximately 3′-0″ apart. (Diagram B)
- Additional vertical blankets can be joined using a minimum 4″ overlapping or shingle style (Diagram C) in the direction of water flow. Connect the blankets by placing staples approximately 12″ apart across the width of the blankets.
- For maximum performance a check slot should be placed at 25′-40′ intervals. Place a row of staples 4″ apart along the entire width of the slope. A second row should be placed 4″ below in a staggered pattern. Then continue with general installation. (Diagram D)
- The end of blanket must be secured in a 6″ x 6″ trench with a row of staples placed at 12″ intervals. (Diagram E)
DIAGRAMS

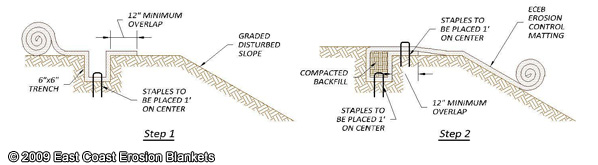
UP-SLOPE TRENCH (DIAGRAM A)
DOWN-SLOPE TRENCH (DIAGRAM E)
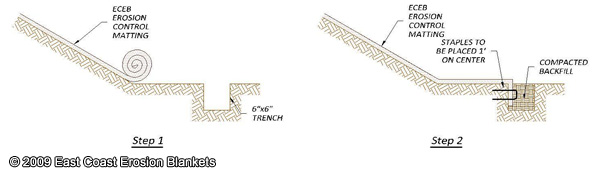
STAPLE PATTERNS